Wednesday, September 1, 2021

Recipe: Peach Dessert

This recipe comes from my husband's Aunt Lanita who passed just before she would have turned 41. From what I hear, she was an excellent cook and baker, and until this post, I'm not sure this recipe ever existed on the internet. It's about time, because y'all have been missing out! This is a real crowd pleaser.

This is my hubby's favorite dessert (besides pecan pie). It is a no-bake layered dessert that requires a minimum of 2 hours of refrigeration and a decent amount of self-control.

Aunt Lanita's Peach Dessert

Crust

1/2 c. salted butter, melted

3 pkgs. graham crackers, crushed


Instructions:

1. Crush graham crackers in food processor; slowly add melted butter. Optional: reserve 1/4 c. to sprinkle on top of finished dessert. 

2. Press crust into 13x9 casserole dish. Set aside.


Creamy Whip

8 oz. cream cheese, softened

2 pkgs. Dream Whip, no substitutes

1 cup milk

1/2 t. vanilla

1/2 c. powdered sugar


Instructions:

1. Beat cream cheese until smooth; set aside.

2. Beat Dream Whip, milk, vanilla, and powdered sugar until it has a whipped consistency. Fold in cream cheese; mix until thick and smooth.

3. Spread 1/2 of mixture onto crust; reserve remaining half.


Fruity Jello Layer

2 c. water

3/4 c. sugar

2 T. cornstarch, heaping

1 small pkg. (3 oz.) orange Jello

4 c. sliced peaches, with skin removed (fresh is best)


Instructions:

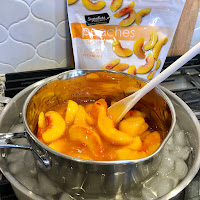
1. Combine water, sugar, cornstarch, and jello; cook until thickened, about 2 minutes. Cool (in refrigerator or ice bath).

2. To prepare fresh peaches, blanch in boiling water, place in ice water, and remove skin. Slice thinly.

3. Once mixture is cooled, but not fully set-up, stir in 4 c. of sliced peaches until mixed. 

4. Spoon fruity jello mixture on top of creamy whip layer and smooth out.

5. Spoon remaining half of creamy whip onto fruity jello layer and smooth out. (It is a little easier to spread if the fruity jello layer has set up some, but either way works and tastes delicious.)

6. Optional: Sprinkle reserved portion of crust onto top layer of creamy whip.

7. Refrigerate for at least 2 hours.


Cook's Note: This recipe is time consuming, but is worth the toil. You can also switch out the fruit and jello flavors, for example, with fresh raspberries and raspberry jello. I've tried peach jello, and trust me, orange works best.


Shown with optional graham topping

Monday, February 9, 2015

Recipe: Lemon-Berry Syrup

Lemon-Berry Syrup (for those days you can't have lemon-filled donuts)

Ingredients:
2 T. cornstarch
1/4 c. Real Lemon juice
splash lime juice
1/4 c. sugar
3/4 c. water
2 T. strawberry jelly*

Mix cornstarch with lemon juice, lime juice, sugar and water until smooth. Warm using medium heat. Bring to a boil. Stir in jelly and remove from heat. Serve warm. Serves 5-6.

Cook's Note: This goes great on puffy pancakes. Here's a puffy pancake recipe similar to the one I use, although I don't use vanilla or cinnamon in the batter, and I add more melted butter. I'm sure you could fill doughnuts with this syrup as well--you may need to add 1-2 T. more of cornstarch. *I used Smucker's Natural Strawberry jam without High Fructose Corn Syrup so it isn't overly sweet.

What else might this be tasty with?

Monday, July 28, 2014

Crispy Crunchy Caramel Corn

Kids will love this fun combo of caramel corn and rice crispy treats.

Ingredients:
2 bags microwave popcorn, popped
1 stick butter
1/2 c. granulated sugar
2/3 c. brown sugar
1/3 c. karo syrup
1 t. vanilla
1/4 t. baking soda
2 c. rice krispies
2 c. miniature marshmallows

Instructions:
1. Put popcorn in very large bowl, and removed unpopped kernels.
2. Melt butter, sugars, and corn syrup in a saucepan and bring to a boil. Boil 1 minute and remove from heat. Add vanilla and baking soda. Stir well.
3. Pour caramel sauce over popcorn and stir to coat. Add rice krispies and stir to coat. Add marshmallows and mix one last time.
4. Devour with reckless abandon.

Cook's Note: I'm going to try adding a few cups of small pretzels next time.

Sunday, February 9, 2014

Recipe: Spicy Buffalo Chicken Dip

16 oz. cooked chicken (shredded) or canned chicken
8 oz. pkg. cream cheese, softened
1/4 - 1/2 c. ranch dressing (I prefer the lesser amount)
1/3 c. "Frank's Original Hot Sauce"--no substitutions
Bag of your favorite tortilla chips

Crockpot directions:
Combine all ingredients in a crockpot and heat on low, stirring every 10-15 minutes until dip is warm (may take 45 minutes depending on your crockpot). Set temp on "warm" when serving at parties.
 
Microwave directions:
Combine all ingredients in a large bowl, preferably glass. Heat in microwave on high for 3 minutes or until mixture is heated evenly. Stir halfway through heating time.


Serve with tortilla chips.

Tuesday, July 16, 2013

Recipe: Helen Wride's "Long Johns" Maple Bars

"Long Johns" Maple Bars / Doughnuts

Dough Ingredients:
1/2 c. butter
1/2 c. sugar
3 eggs, beaten
1 t. salt
2 packages yeast
2 c. warm water
7-8 c. sifted flour

Directions:
Cream butter and sugar. Add eggs and salt. Sprinkle yeast over warm water. When dissolved add to sugar mixture and knead in flour to make a soft dough. Let rise until doubled. Roll 1/4-inch thick. Cut for bars or doughnuts, let rise approximately one hour. Fry in fat 370 degrees. Drain.

Maple Frosting for Long Johns 

Frosting Ingredients:
1/4 c. butter
1/2 c. brown sugar
1/4 t. maple flavoring (or mapleine)
1 c. sifted powdered sugar

Also can use powdered sugar frosting flavored with mapleine.

Cook's note: You may want to half the recipe if you're not planning on feeding a whole Wride Tribe.

Tuesday, November 15, 2011

Wride's Guide Cookbook--FREE Download

Please meet my family's favorite cookbook:

the Wride's Guide to Good Home Cookin'.

The 2006 edition was a success, with tasty treats, amazing mains, and delicious desserts. Now with the 2008 insert, it contains over 200 mouth-watering recipes!

  • Original 2006 Cookbook + 2008 Recipes = Over 200 recipes in the Treasured Collection Worth Hoarding
  • Just print, 3-hole punch, and insert into the binder of your choice (2" binder works well). A 3-ring binder also makes it a snap to add more of your own family's favorite recipes.

Click here to download the FREE cookbook files to print your own copy.


Throwback to how young I was in 2008.

Friday, July 16, 2010

Print Your Own Wride's Guide Cookbook

Thanks to Google Drive, I'm including links to the cookbook files so that you can print your very own copy of Wride's Guide to Good Home Cookin'!

Materials:

Besides a printer, you'll need:

  • a 2" binder with clear sleeve for cover

  • 80-120 lbs. cardstock for cover and dividers

  • 20 lbs. printer paper

  • 3-hole punch

Optional: 70 sheet protectors (for both dividers and interior recipe pages). The dividers print file includes DIY tabs, so you can choose to attach matching tabs to the dividers for a papercrafty-look (see images at end of post), OR slip divider pages into sheet protectors. *I highly recommend that all the recipe pages are put in sheet protectors, unless you're an immaculate cook without elvish helpers.


Easy access to all cookbook files:

Wride's Guide to Good Home Cookin': all files in a Google Drive folder


All the pieces-parts of the cookbook:

Exterior: Cookbook Cover (full color, print on cardstock)

Interior: Cookbook Dividers (full color, print on cardstock, single-sided)

Interior: Original 2006 Recipes (b/w, print on regular printer paper, double-sided)

Interior: Additional 2008 Recipes (b/w, print on regular printer paper, double-sided)


Please enjoy this recipe collection worth hoarding, but also worth sharing. Bon Apetit!


* Alana Lee retains the copyright to the cookbook files and all images contained therein. These files are for non-commercial use only--meaning you aren't going to sell the files/images or sell any cookbooks created with these files. Thanks for being honest.